Mastering Redux
Let's Build a Redux Clone
To get a better understanding of how Redux works we are going to build a simplified Redux clone from scratch. To visualize how Redux works, I’ve made an interactive flow chart to go along with this blog post. Have fun!
Isn’t Redux like… old?
Redux was first released way back in 2015 and since then we have seen plenty of new ways to manage state in React. We have Context, Zustand, Jotai and XState just to name a few. Does it even make sense then to spend time learning about Grampa Redux?
For a lot of simpler applications, React’s Context will probably suffice, however, as we will see in this blog post, the real strength of Redux comes when we leverage its middleware feature. Middleware is something Context doesn’t support out-of-the-box.
Besides, there are thousands of React apps in the wild that are built using Redux, so chances are good that you will eventually work on a project with Redux. So yes, Redux may be old, but it’s not dead and it’s definitely still worth understanding how it works.
What is Redux?
In short, Redux is a state management library. It is most often used in React applications, but it is actually framework agnostic. Once we integrate Redux with React we have an easy and predictable way to access and update state from anywhere in our application. With Redux middleware we will be able to handle operations related to our state such as fetching data from an API and placing it into Redux, logging Redux state etc.
How does Redux work?
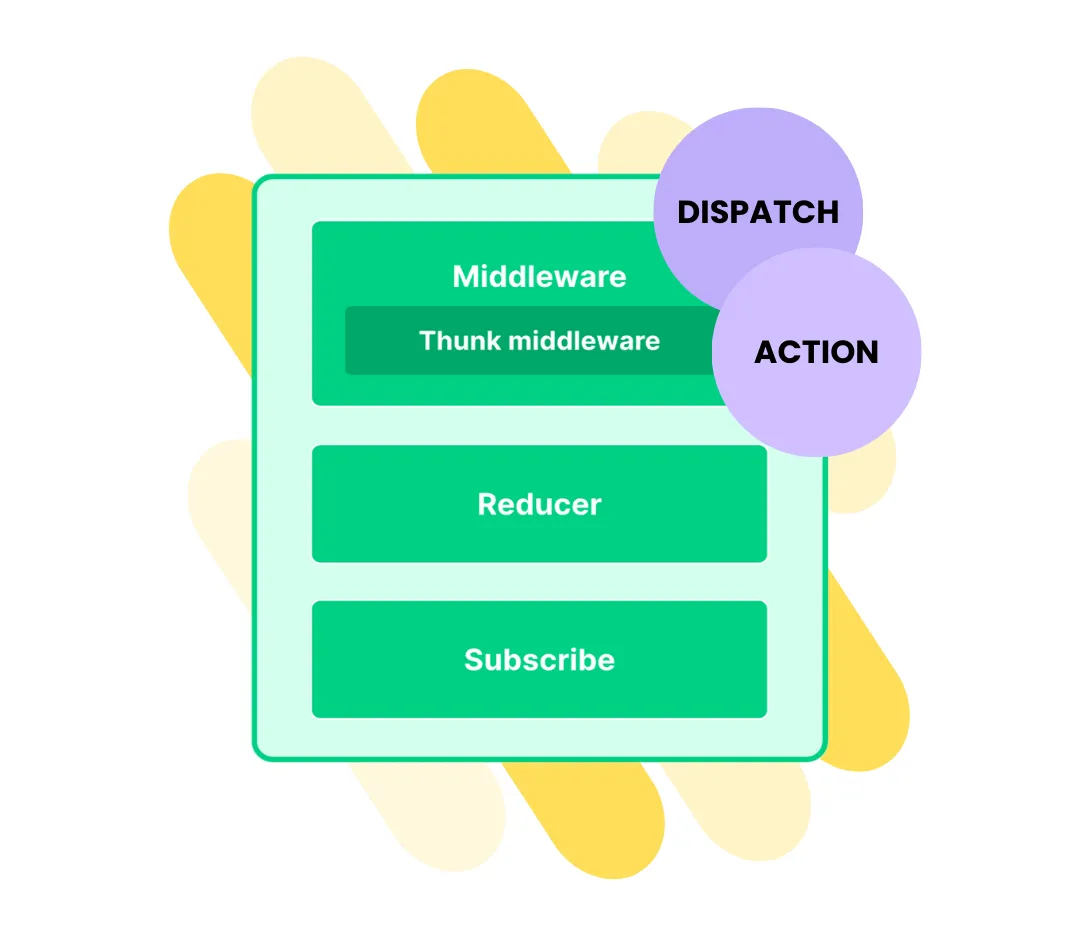
In Redux we always have a single store and that store contains our state. The store allows us to subscribe to changes made to the state and it allows us to update the state by sending an action to the store. We do that using the dispatch method. A dispatched action will first go through any middleware the store has and then through the store’s reducer where it will update the existing state and return the new state to all subscribers. An action can also dispatch new actions along the way
What we will build
We will build our own version of Redux and even though it will be greatly simplified compared to The Real Redux, it will have everything we need to get a good understanding of how Redux works.
Since Redux is most often used with React, we will drop our Redux Clone into a small React application. The only thing the application does is 1) fetch a random Pokémon from an external API and 2) display the Pokémon on the screen. We will then use our Redux Clone to manage the state.
I assume that you are already familiar with React, Reducers and Context. If not, I hope that you are a fast learner.
Application Step-by-Step
Here’s a step-by-step breakdown of how our React application will use the Redux Clone.
- A user is presented with our UI. The UI contains a
Fetch Pokemonbutton and a status text that saysNo Pokemon. - The user clicks the
Fetch Pokemonbutton. - We
dispatchanactionof typefetch. - The
storereceives ouractionand runs it through themiddleware. - The
thunk-middlewaresees that the action has afetchmethod and invokes it. - The
fetchmethod makes an async call to an API. Since the API may be slow to respond wedispatchanactionof typefetching. - The new fetching
actionis also run through the store’s middleware, but nothing happens since it has no method that can be invoked by thethunk-middleware. - The
actionthen runs through thereducerand updates the “status” state. - Since our UI (React) is
subscribedto the store it receives the new state and accordingly changes the status text toFetching.... - Eventually, the API responds to our request and returns the Pokémon data. We
dispatcha newactionof typefetchedand this time we include the Pokémon data as a payload. - Like before, our
actionsfirst run through themiddleware, but again there’s no action method to be invoked. - The
actionproceeds to thereducerand here it now updates the “status” and the “pokemon” properties. - Again our UI receives the updated state from the store and can now show the Pokémon we fetched from the API.
Interactive flow chart
That’s a lot of steps to wrap your head around. To make it easier I build this fancy interactive flow chart. Click the button and each step will be shown.
The Store
Now that we know exactly what we are building, let’s get coding! I mentioned that we always have a store in Redux and that’s where we will start.
const createStore = (reducer, initialState) => {
  const store = {
    state: initialState,
    listeners: [],
    getState: () => store.state,
    subscribe: (listener) => {
      store.listeners.push(listener);

      return () => {
        const index = store.listeners.indexOf(listener);
        store.listeners.splice(index, 1);
      };
    },
    dispatch: (action) => {
      store.state = reducer(store.state, action);
      store.listeners.forEach((listener) => listener());
    }
  };

  return store;
};
Instead of going through the createStore function line by line (use ChatGPT for that), I will zoom in on the most important parts; subscribe and dispatch.
Subscribe
The subscribe method allows us to “listen” to changes in the store’s state. When the store’s state updates, all subscribed listeners are notified. In our case, it will be React Components that subscribe to the store.
Dispatch
The dispatch method is used to send, or “dispatch”, actions to the store. When an action is dispatched, the store uses the reducer to determine how the state should change in response to that action. After the state is updated, all subscribed listeners are called, notifying them of the change.
The createStore function is the core of our Redux Clone. We can use it in different applications without changing it. What will change from application to application is the two parameters: Initial State (to initialize our store’s state) and Reducers.
Reducer
The store in our Redux Clone expects a single reducer (in the real Redux a store can have multiple reducers). The reducer is passed into the store as an argument to createStore.
const reducer = (state, action) => {
  switch (action.type) {
    case 'idle':
      return { ...state, status: 'idle' };

    case 'fetching':
      return { ...state, status: 'fetching', pokemon: null };

    case 'fetched':
      return { ...state, status: 'fetched', pokemon: action.payload };

    default:
      return state;
  }
};
As you can see it’s an ordinary reducer. Any action dispatched to the store will go through the reducer and return a new object with the updated state.
By now we can create a fully functioning Redux store:
const initialState = { status: 'idle', pokemon: null };
const store = createStore(reducer, initialState);
Since we need the store to work in our Pokémon application we need a way to integrate it with React.
React Integration
We can use React’s Context to make the store available throughout our application.
const ReduxContext = createContext();

const ReduxProvider = ({ children, store }) => (
  <ReduxContext.Provider value={store}>
    {children}
  </ReduxContext.Provider>
);
Now that we can access the store in our components, we need an easy way to get the store’s state. Both when our component mounts, but also when the store’s state is updated. Maybe a small hook?
const useSelector = (selector) => {
  const store = useContext(ReduxContext);
  const [state, setState] = useState(selector(store.getState()));

  useEffect(() => {
    const unsubscribe = store.subscribe(() => {
      const newState = selector(store.getState());
      setState(newState);
    });

    return () => {
      unsubscribe();
    };
  }, [selector, store]);

  return state;
};
The selector parameter is a callback function that, when given the store’s state, extracts and returns a specific slice of that state.
Inside useEffect, we subscribe to changes in the store. When the store’s state changes, we update our local state with setState, causing our component to rerender with the new state.
Here’s an example of how we can use useSelector in a component.
const ShowStatus = () => {
  const status = useSelector((state) => state.status);

  return (
    <p>Status: {status}</p>
  );
}
As you can see we use the selector to pick just status instead of returning the entire state object.
Let’s also create a hook to access the store’s dispatch method.
const useDispatch = () => {
  const store = useContext(ReduxContext);
  return store.dispatch;
};
And here’s an example with the useDispatch hook.
const FetchPokemonButton = () => {
  const dispatch = useDispatch();

  const handleClick = () => {
    // Dispatch the "fetching" action
    dispatch({
      type: 'fetching'
    });

    // Fetch a random Pokémon
    fetch(`https://pokeapi.co/api/v2/pokemon?limit=1&offset=${Math.floor(Math.random() * 1000)}`)
      .then((res) => res.json())
      .then((json) =>
        // Dispatch the "fetched" action
        // with the Pokémon as the payload
        dispatch({
          type: 'fetched',
          payload: json.results[0]
        })
      );
  };

  return <button onClick={handleClick}>Fetch Pokémon</button>;
};
We first dispatch a “fetching” action to the store. This allows us to immediately update our UI with a message that informs the user that the request is being processed.
Once the asynchronous fetch completes, we dispatch another action that contains the fetched data. Now we can update our UI with the fetched Pokémon.
Be sure to check out the flow chart if this doesn’t quite make sense.
Let’s run the first version
With our React integration in place, we now have everything we need to run our application. Are you excited?
Will it run?

( v1.0 without middleware )
Middleware
We now have a working state manager. Still, it feels a little like a one-trick pony. It would be nice if we could make our Redux Clone extendable and make it cater to different use cases. That’s exactly what middleware is - a way for us to extend Redux.
The simplest type of middleware is probably a logger. Below is a loggerMiddleware that will log all actions dispatched to the browser’s console. Simple, but useful.
const loggerMiddleware = (store) => (next) => (action) => {
  console.log(action);
  return next(action);
};
Redux favours functional programming over object-oriented programming hence the curried function signature above.
Explaining currying is beyond this blog post. However, if the technique is new to you, just know that we will use currying to pass getState and dispatch to our middleware.
Our Redux Clone should be able to handle multiple middlewares. We will create an applyMiddleware function that can help us with that.
const applyMiddleware = (...middlewares) => {
  return (createStore) => (reducer, initialState) => {
    const store = createStore(reducer, initialState);

    const composedMiddleware = middlewares
      .map((middleware) => {
        // Give the middleware access to
        // the store's state and dispatch.
        return middleware({
          getState: store.getState,
          dispatch: (action) => store.dispatch(action)
        });
      })
      .reduce((composed, middleware) => {
        // Compose the middleware together.
        return (...args) => composed(middleware(...args));
      });

    // Override the store's dispatch method.
    // Now any action dispatched will run
    // through each middleware first.
    store.dispatch = composedMiddleware(store.dispatch);

    return store;
  };
};
We use the parameter createStore function to create our store inside of applyMiddleware. We can then pass the store’s getState and dispatch methods to each middlware, which we then compose (or chain) together.
We return to our createStore function for the final adjustment.
const createStore = (reducer, initialState, middleware) => {
  if (middleware) {
    return middleware(createStore)(reducer, initialState);
  }
  ...
};
Here we have added a third optional middleware parameter. If the new middleware parameter is available we invoke it and instead return the store created in applyMiddleware.
That’s all we need to support middleware in Redux Clone!
And we can do a lot more than logging with our middleware. A very common middleware is Redux Thunk which allows us to dispatch functions as actions and have our middleware invoke those functions. The functions can be asynchronous or have other side effect.
That seems useful to us, so let’s write a thunkMiddleware.
const thunkMiddleware = (store) => (next) => (action) => {
  if (typeof action === 'function') {
    return action(store.dispatch, store.getState);
  }
  return next(action);
};
Now that we have written two middlewares let’s see how we can add them to the new store.
const initialState = { status: 'idle', pokemon: null };
const middleware = applyMiddleware(loggerMiddleware, thunkMiddleware);
const store = createStore(reducer, initialState, middleware);
Action Creators
A common practice in Redux is to use Action Creators to create the action we want to dispatch. Action Creators help us reduce code duplication and extract logic out from our components.
Action Creators may seem like overkill in our tiny Pokémon application, however now with thunkMiddleware our store can also handle actions that are functions. Let’s use Action Creators to create both action objects and action functions.
const fetching = () => ({
  type: 'fetching'
});

const fetched = (pokemon) => ({
  type: 'fetched',
  payload: pokemon
});

const fetchPokemen = () => (dispatch) => {
  // Dispatch the "fetching" action
  dispatch(fetching());

  // Fetch a random pokemon
  fetch(`https://pokeapi.co/api/v2/pokemon?limit=1&offset=${Math.floor(Math.random() * 1000)}`)
    .then((res) => res.json())
    .then((json) =>
      // Dispatch the "fetched" action
      // with the Pokémon as the payload
      dispatch(fetched(json.results[0]))
    );
};
The Action Creators fetching and fetched both return plain objects.
The fetchPokemen is a bit more interesting. It returns a function and if we look closer we see that the function has the same behavior as the click event handler handleClick. Why is that? Because we know that action functions will be invoked by thunkMiddleware we can extract logic out from the component and place it into an Action Creator.
We also see that fetchPokemen has access to the dispatchmethod (thanks applyMiddleware), which means that we are not restricted to only dispatching events from components.
That leaves us with a small and very readable React component.
const FetchPokemonButton = () => {
  const dispatch = useDispatch();

  const handleClick = () =>
    dispatch(fetchPokemen());

  return <button onClick={handleClick}>Fetch Pokémon</button>;
};
Let’s run the final version
By adding support for middleware we have made our Redux Clone extendable and with Action Creators we have better separation of concerns and our actions stay DRY.
The UI will look the same as in the first version, but that doesn’t mean that we shouldn’t take our final version for a test run.
Will it run?
( v1.1 with middleware )
Wrap up
I hope that you enjoyed this blog post and I hope that you have a better understanding of how Redux works. I appreciate any feedback you have small or big.
Connect and say hi on LinkedIn or X/Twitter 😊
You can find the source code on GitHub.